
When I first discovered Altered Art, I was so excited as it brings me into another level of creativity. Altered Art means changing an ordinary object into a creative piece of art. I supposed I had done a lot of Altered Art before, not knowing that there is a term for it. And of course, I was equally ignorant about archival-quality papers, adhesives and other materials used. These days, with the popularity of scrapbooking, we are just spoilt for choices for all these materials available in craftstore. With all these acid-free paper, materials, acid-neutralising spray; we can preserve cherished memories to share with the future generations; well, at least to slow down the aging process.
There are many different techniques to express your creativity . You can use painting, doodling, stamping, needlework, college, faux finishing, inking; practically anything that can turn your work into your own personalised creations! There is no necessity to follow others' style. In the following ideas page, I will feature some of my works. I hope that you can send in your creations to share with us.
![]() Paper trimmer
Paper trimmer
![]() Paper puncher
Paper puncher
![]() Acrylic paints
Acrylic paints
![]() Copies of photos
Copies of photos
![]() Mod Podge
Mod Podge
![]() Glue tapes, glue dots, doubled sided tapes
Glue tapes, glue dots, doubled sided tapes
![]() Rings
Rings
![]() Ribbons
Ribbons
![]() Cardstock
Cardstock
![]() Embellishments
Embellishments
![]() Ink pads and stamps
Ink pads and stamps
![]() Scissors
Scissors
![]() Craft knife
Craft knife
![]() Mat
Mat
![]() Pattern Paper
Pattern Paper
![]() Brush
Brush
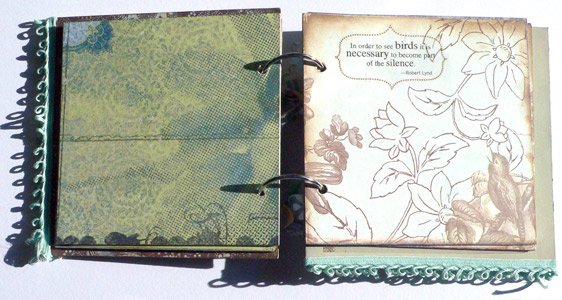
Mini Album
Supplies
Steps

![]() Basecoat cover page, front and back of back page and all the edges of the chipboards with Eggshell. Let dry and paint again. Refer to Painting Tips page.
Basecoat cover page, front and back of back page and all the edges of the chipboards with Eggshell. Let dry and paint again. Refer to Painting Tips page.
![]() Choose a section of Clear Expressionsfor cover page. Trim to 6.5" x 6.5" using a trimmer
Choose a section of Clear Expressionsfor cover page. Trim to 6.5" x 6.5" using a trimmer
![]() Cut 2 of your pattern papers into 6' x 6' , making 8 pages.
Cut 2 of your pattern papers into 6' x 6' , making 8 pages.
![]() Choose another piece for your front cover, 4.5 x 4.5 and trim. Distress the edges with Brushed Corduroy distress ink.
Choose another piece for your front cover, 4.5 x 4.5 and trim. Distress the edges with Brushed Corduroy distress ink.
![]() Trim 3 strps of 1.5" x 4.5" of pattern paper for back cover and distress the edges with Brushed Corduroy
Trim 3 strps of 1.5" x 4.5" of pattern paper for back cover and distress the edges with Brushed Corduroy
![]() Using Mod Podge, apply on the chipboards a generous layer, working quickly, paste trimmed paper onto the pages. Distress all edges of the pages.
Using Mod Podge, apply on the chipboards a generous layer, working quickly, paste trimmed paper onto the pages. Distress all edges of the pages.
![]() Make sure there are no air bubbles. You can use the roller to straighten the paper, working from centre and pushing glue out of paper. Wipe off the excess glue.
Make sure there are no air bubbles. You can use the roller to straighten the paper, working from centre and pushing glue out of paper. Wipe off the excess glue.
![]() I stamped on the cardstock and trim (with a scissors) about 1/10 in around the edges, called detailed cuttings.
I stamped on the cardstock and trim (with a scissors) about 1/10 in around the edges, called detailed cuttings.
![]() Punch all the holes and attach 2 rings to the pages.
Punch all the holes and attach 2 rings to the pages.
![]() On the front cover, stick letterings 'Come let's'.
On the front cover, stick letterings 'Come let's'.
![]() On the Clear Expression Cover, stick letterings 'Life', and stamp on top left
corner to balance design.
On the Clear Expression Cover, stick letterings 'Life', and stamp on top left
corner to balance design.
![]() Attach ribbons to your front and back cover.
Attach ribbons to your front and back cover.
(I did not embellish much on the pages, as I prefer the prints of the pattern paper to stand out.)
![]() Just stamp and place embellishments to your liking.
Just stamp and place embellishments to your liking.
![]() Tie strips of ribbons round the ring.
Tie strips of ribbons round the ring.
![]() Hope you enjoy this project! I know I did!
Hope you enjoy this project! I know I did!


Check out our gallery page, email me if there is any particular project you woulld like to learn. I will try to share with you as soon.
Canvas Book
You need to do this with your children.
What you need
![]() 2 pieces of 6.5"x 8.5" chipboard
2 pieces of 6.5"x 8.5" chipboard ![]() 2 pieces of 7.5" x 9.5" canvas
2 pieces of 7.5" x 9.5" canvas ![]() 2 pieces of 6.25" x8.25" canvas
2 pieces of 6.25" x8.25" canvas ![]() 2 pieces of cut- out fabric with kids graphics
2 pieces of cut- out fabric with kids graphics ![]() 2 cut-out felt shapes
2 cut-out felt shapes ![]() proxy stickers
proxy stickers ![]() letterings stickers
letterings stickers ![]() glittery glue
glittery glue ![]() glue dots
glue dots ![]() assortment of colourful ribbons
assortment of colourful ribbons ![]() 2 rings
2 rings ![]() craft glue
craft glue ![]() eyelets and eyelet setter(optional)
eyelets and eyelet setter(optional) ![]() mod podge
mod podge ![]() sponge brush
sponge brush![]() hole puncher
hole puncher ![]() acrylic paint- buttermilk.
acrylic paint- buttermilk.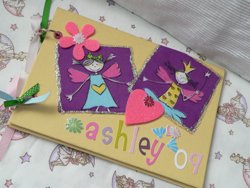
Steps
![]() Paint all the canvas with buttermilk .
Paint all the canvas with buttermilk .
![]() Apply mod podge evenly on chipboard and adhere the bigger canvas over.
Apply mod podge evenly on chipboard and adhere the bigger canvas over.
![]() Cut the 4 end corners of the canvas at a 45 degree about 1/8" away from the board corners.
Cut the 4 end corners of the canvas at a 45 degree about 1/8" away from the board corners.
![]() Score edges of canvas with a stylus. Glue the edges down to the inside of the book cover.
Score edges of canvas with a stylus. Glue the edges down to the inside of the book cover.
![]() Attach the smaller canvas on the inside front cover.
Attach the smaller canvas on the inside front cover.
![]() Repeat the steps for the back cover.
Repeat the steps for the back cover.
![]() Use a heavy duty hole puncher, punch 2 holes.
Use a heavy duty hole puncher, punch 2 holes.
![]() With an eyelet setter, set eyelets on the top of the punched hole, ( over a mat) turn over and firmly strike with a hammer 2 or 3 times till the hole is cut clearly.
With an eyelet setter, set eyelets on the top of the punched hole, ( over a mat) turn over and firmly strike with a hammer 2 or 3 times till the hole is cut clearly.
![]() Now comes the most interesting steps- decorate- paste the graphics with craft glue.
Now comes the most interesting steps- decorate- paste the graphics with craft glue.
![]() Decorate with proxy stickers, cut- out shapes, glitter glue and tie ribbons round the rings.
Decorate with proxy stickers, cut- out shapes, glitter glue and tie ribbons round the rings.
![]() If stickers do not stick too well, apply a coat of varnish over.
If stickers do not stick too well, apply a coat of varnish over.
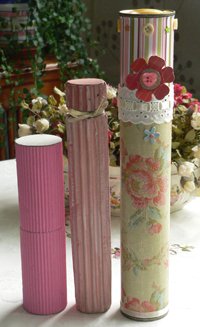
Scroll- Container
 What you need
![]() mod podge
mod podge ![]() pattern paper, choose a stripped and floral design
pattern paper, choose a stripped and floral design ![]() scroll container
scroll container ![]() assortment of buttons
assortment of buttons ![]() lacy ribbon and silk ribbon
lacy ribbon and silk ribbon ![]() cut-out flower
cut-out flower ![]() 4 brads
4 brads
Steps
![]() Use a string to measure the diameter of the cylinder.
Use a string to measure the diameter of the cylinder.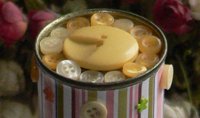
![]() Cut out the required size for both the top and bottom of container.
Cut out the required size for both the top and bottom of container.
![]() Apply mod podge evenly on scroll and paste pattern paper over, making sure that there is no bubbles.
Apply mod podge evenly on scroll and paste pattern paper over, making sure that there is no bubbles.
![]() Decorate the cover with buttons.
Decorate the cover with buttons.
![]() Decorate the surface with brads , buttons and ribbons.
Decorate the surface with brads , buttons and ribbons.
I bought this scroll for only S$2. You can also customise our own scroll by using recycled kitchen scroll.
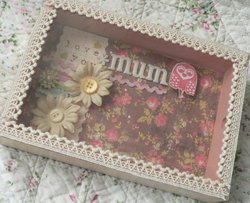
Shadow box
What you need
![]() mod podge
mod podge ![]() pattern paper, choose floral design,one with darker print and another with lighter print
pattern paper, choose floral design,one with darker print and another with lighter print ![]() box 5.5"x 7.75"
box 5.5"x 7.75" ![]() buttons
buttons ![]() lacy ribbon and silk flower
lacy ribbon and silk flower![]() cut-out owl
cut-out owl ![]() stamped "love you"
stamped "love you" ![]() acrylic paint- Decoart dusty rose
acrylic paint- Decoart dusty rose ![]() pop dots
pop dots ![]() glue tape
glue tape ![]() acrylic to fit as cover
acrylic to fit as cover ![]() double sided tape
double sided tape
Steps
![]() Paint the inner sides and back of box with dusty rose. Let dry. Refer to tips on painting on wood.
Paint the inner sides and back of box with dusty rose. Let dry. Refer to tips on painting on wood.
![]() Cut the darker print pattern paper to about 7"x 5" to fit inside of box.
Cut the darker print pattern paper to about 7"x 5" to fit inside of box.
![]() Choose the lighter print, cut strips to fit the 4 sides of box and also another piece 2"x 5".
Choose the lighter print, cut strips to fit the 4 sides of box and also another piece 2"x 5".
![]() Apply mod podge, and paste all the pattern paper , one at a time. Wipe off the excess with kitchen towel.
Apply mod podge, and paste all the pattern paper , one at a time. Wipe off the excess with kitchen towel.
![]() Decorate with silk flowers and owl; raise them with pop dots.
Decorate with silk flowers and owl; raise them with pop dots.
![]() I use my left over letterings for "mum"
I use my left over letterings for "mum"
![]() The space is for photo.
The space is for photo.
![]() Cover the box with the fitted acetate, and secure with double sided tape.
Cover the box with the fitted acetate, and secure with double sided tape.
![]() Decorate with lace or ribbon of your choose.
Decorate with lace or ribbon of your choose.
Mini Die- cut book
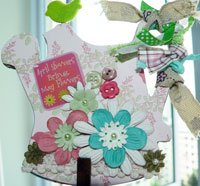 This die-cut watering can is actually a mini wooden die-cut.
![]() Select 4 pattern paper that has small prints.
Select 4 pattern paper that has small prints.
![]() Trace the outlines of the watering- can over the 4 different print pattern paper. Cut them with a sharp scissors.
Trace the outlines of the watering- can over the 4 different print pattern paper. Cut them with a sharp scissors.
![]() Apply a thin layer of mod podge, and paste the pattern paper (which you chose as front cover ) over the mini wooden die-cut.
Apply a thin layer of mod podge, and paste the pattern paper (which you chose as front cover ) over the mini wooden die-cut.
![]() Apply glue tape on the " handle " of the watering can and paste the 2nd page over. Do the same for page 3 and 4.
Apply glue tape on the " handle " of the watering can and paste the 2nd page over. Do the same for page 3 and 4.
![]() Embellish with prima flowers, mini buttons and eproxy. Tie the " handle " with assortment of ribbons.
Embellish with prima flowers, mini buttons and eproxy. Tie the " handle " with assortment of ribbons.
![]() I clipped a tiny felt birdie on the inside pages.
I clipped a tiny felt birdie on the inside pages.