

Free step by step instructions on Children's Craft - to inspire your children to be more creative!
In this children's craft ideas,I will be sharing many interesting craft ideas and I can assure you : your children will definitely enjoy them! That is because all children LOVE craft. Those who don't probably have not been exposed much to craft before. For very young children, we can start them with very simple projects. When my children were very young, (as young as 18 months ) they did lots of hands printing and feet printing. They experimented with different mediums such as non- toxic paint, crayons, colour pencils and chalk. As they grew older, they progressed to mini projects like coloured sand bottles, "stained glass" ornaments, beading, (bobby pins) pebble art, clay modelling, friendship bracelets, wiring art (using wires to make rings, bookmarks, stick people ). Their school holidays were always packed with craft projects which they never got tired of.
Besides borrowing craft books, we own many of them which my children actually learnt the skill themselves.Today, my elder daughter who reads Art, Design & Media in University, knits, cross stitches, crochet, does beautiful friendship bands, sculpturing and dabbles in origami. (whereas I do not do any of these) On the other hand, my younger daughter has good sense of colours and graphic layouts, she is currently studying Arts Business Management. Whatever it is, their early exposure to different forms of art, made them what they are today.
I will try to share as many of these crafts in the following months, do come back for updates often. Check out our blog and see how happy the children are.
| Bandana | ||
| Wired Stick People | ||
| Wired bracelet | ||
| Creative Art | ||
| Canvas Scrapbook | ||
| Canvas Shoes |
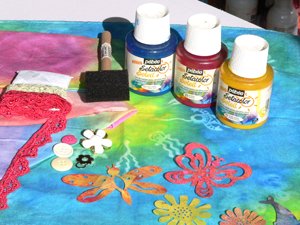
SunPaint Art
This art is so amazing! We actually need sunshine to make colour fabric prints. It was discovered by artists on a Pacific Island who found that a palm branch that had fallen onto a piece of fabric, (that had been painted and left outside to dry) when removed, left a beautiful pastel image of palm leaves on the colour fabric. Some of the projects that you can do include bandana, napkins, window topper, pillows and scarfs. I will be teaching you how to print on a bandana. My children and I had done this several times and we simply love it!
What you need
![]() SUNSHINE is a must!
SUNSHINE is a must!
![]() Paints: red, yellow and blue ( Pebeo Setacolour )
Paints: red, yellow and blue ( Pebeo Setacolour )
![]() Objects for masking; ( the accidental artists had fallen lleaves ) we can use anything ranging from buttons, pretzels, strings, lace, silk flowers or cut-out shapes )
Objects for masking; ( the accidental artists had fallen lleaves ) we can use anything ranging from buttons, pretzels, strings, lace, silk flowers or cut-out shapes )
![]() Old brush ( or sponge brush )
Old brush ( or sponge brush )
![]() Lightweight 100 per cent white cotton. (15 x15 ) in
Lightweight 100 per cent white cotton. (15 x15 ) in
 |
|
Steps
![]() Choose a sunny day.
Choose a sunny day.
![]() Place a piece of aluminium foil or plastic sheet below the sewn fabric.( to prevent paint from staining the work area and also to carry out to sunny place)
Place a piece of aluminium foil or plastic sheet below the sewn fabric.( to prevent paint from staining the work area and also to carry out to sunny place)
![]() Using a sponge brush, wet fabric with water and spread it flat at the same time. ( It should be wet and not damp )
Using a sponge brush, wet fabric with water and spread it flat at the same time. ( It should be wet and not damp )
![]() Brush the wet fabric with diluted paint. (1 spoon of paint to 1 spoon of water for very bright colour; 1 spoon of paint to 3 spoons of colour for more dilute colours)
Brush the wet fabric with diluted paint. (1 spoon of paint to 1 spoon of water for very bright colour; 1 spoon of paint to 3 spoons of colour for more dilute colours)
You can form any patterns (zig zag or round circles )
![]() If your work area has no sun, you can carry your fabric ( hold it flat) to a sunny place.
If your work area has no sun, you can carry your fabric ( hold it flat) to a sunny place.
![]() Place your mask shapes or objects.
Place your mask shapes or objects.
Leave them in the sun until it is completely dry.
![]() To make the prints permanent, with the help of an adult, iron the beautiful bandana for 3 minutes with an iron on the "cotton" setting.
To make the prints permanent, with the help of an adult, iron the beautiful bandana for 3 minutes with an iron on the "cotton" setting.
![]() Though the colour will not run now, I suggest that you should handwash your bandana and not to bleach it.
Though the colour will not run now, I suggest that you should handwash your bandana and not to bleach it.
Hope you enjoy this amazing art that is also suitable for very young children .
Check out our interesting and creative workshops for children in our workshop page.

What you need
To make one stick people
![]() Two 10" pieces of wire
Two 10" pieces of wire ![]() button with 2 holes
button with 2 holes ![]() 3" wire
3" wire
Can keep to the same colour.
Steps
![]() Thread the 3" wire through the holes of the button.
Thread the 3" wire through the holes of the button.
![]() Curl the threaded wire into eyeballs.
Curl the threaded wire into eyeballs.
![]() Thread the 10" wire through the back of the button (the loop)
Thread the 10" wire through the back of the button (the loop)
![]() Leave about 2"- 3 " of wire at the top to create different hairstyle.
Leave about 2"- 3 " of wire at the top to create different hairstyle.
![]() To create the neck, Twist the long tails of wire together .
To create the neck, Twist the long tails of wire together .
![]() Bend the arms, leaving a loop on the end as hands.
Bend the arms, leaving a loop on the end as hands.
![]() Twist the body as the neck.
Twist the body as the neck.
![]() As for the legs, do it the same as for the arms.
As for the legs, do it the same as for the arms.
![]() Style the hair as you desire. Have Fun!
Style the hair as you desire. Have Fun!
Try this out before doing with your children. I'm sure you will enjoy it too!
What you need
![]() 2 contrasting colours wires about 5" for each figure 8 link . (refer to photo )
2 contrasting colours wires about 5" for each figure 8 link . (refer to photo )
May be a good craft when teaching your child number 8.
Steps
![]() Make a figure 8 with one end of the wire.
Make a figure 8 with one end of the wire.
![]() Wrap the ends around the centre a few times. Snip off with an old nail clipper.
Wrap the ends around the centre a few times. Snip off with an old nail clipper.
![]() Do the next piece the same way and loop it through the first link.
Do the next piece the same way and loop it through the first link.
![]() Your probably need about 10 - 12 links depending on the size of your child's wrist.
Your probably need about 10 - 12 links depending on the size of your child's wrist.
Try to figure out how to do the other bracelet. Hint: Use a pencil to help to coil the wire.
Special thanks to KLUTZ for the wonderful sunpaint and wire ideas.

I found these pieces of treasures that were done by Amanda and me when she was probably 2 -3 years old.
What you need
![]() Non-toxic poster paint of various colours.
Non-toxic poster paint of various colours.
![]() White Art paper
White Art paper
To be honest, I had forgotten how we did these, propably just splashing the paints, one colour at a time. Whatever it is , it looks like a messy job, so remember to wear aprons and cover your work area. Just try these out , they look real fun!
You need to do this with your children.
What you need
![]() 2 pieces of 6.5"x 8.5" chipboard
2 pieces of 6.5"x 8.5" chipboard ![]() 2 pieces of 7.5" x 9.5" canvas
2 pieces of 7.5" x 9.5" canvas ![]() 2 pieces of 6.25" x8.25" canvas
2 pieces of 6.25" x8.25" canvas ![]() 2 pieces of cut- out fabric with kids graphics
2 pieces of cut- out fabric with kids graphics ![]() 2 cut-out felt shapes
2 cut-out felt shapes ![]() proxy stickers
proxy stickers ![]() letterings stickers
letterings stickers ![]() glittery glue
glittery glue ![]() glue dots
glue dots ![]() assortment of colourful ribbons
assortment of colourful ribbons ![]() 2 rings
2 rings ![]() craft glue
craft glue ![]() eyelets
eyelets ![]() mod podge
mod podge ![]() sponge brush
sponge brush![]() hole puncher
hole puncher ![]() acrylic paint- buttermilk.
acrylic paint- buttermilk.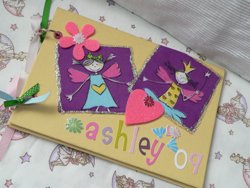
Steps
![]() Paint all the canvas with buttermilk .
Paint all the canvas with buttermilk .
![]() Apply mod podge evenly on chipboard and adhere the bigger canvas over.
Apply mod podge evenly on chipboard and adhere the bigger canvas over.
![]() Cut the 4 end corners of the canvas at a 45 degree about 1/8" away from the board corners.
Cut the 4 end corners of the canvas at a 45 degree about 1/8" away from the board corners.
![]() Score edges of canvas with a stylus. Glue the edges down to the inside of the book cover.
Score edges of canvas with a stylus. Glue the edges down to the inside of the book cover.
![]() Attach the smaller canvas on the inside front cover.
Attach the smaller canvas on the inside front cover.
![]() Repeat the steps for the back cover.
Repeat the steps for the back cover.
![]() Use a heavy duty hole puncher, punch 2 holes.
Use a heavy duty hole puncher, punch 2 holes.
![]() With an eyelet setter, set eyelets on the top of the punched hole, (over a mat ) turn over and firmly strike with a hammer 2 or 3 times till the hole is cut clearly.
With an eyelet setter, set eyelets on the top of the punched hole, (over a mat ) turn over and firmly strike with a hammer 2 or 3 times till the hole is cut clearly.
![]() Now comes the most interesting steps- decorate- paste the graphics with craft glue.
Now comes the most interesting steps- decorate- paste the graphics with craft glue.
![]() Decorate with proxy stickers, cut- out shapes, glitter glue and tie ribbons round the rings.
Decorate with proxy stickers, cut- out shapes, glitter glue and tie ribbons round the rings.
![]() If stickers do not stick too well, apply a coat of varnish over.
If stickers do not stick too well, apply a coat of varnish over.

My daughter, Charlotte made this herself and had already worn it twice. From what you see, you will know that she loves colours.
What you need
![]() White canvas shoes
White canvas shoes![]() fabric paint
fabric paint ![]() pebeo touch deco
pebeo touch deco ![]() brush
brush
Steps
![]() To create the colourful effect, start from the darkest colur, dab the colours on your canvas shoes..
To create the colourful effect, start from the darkest colur, dab the colours on your canvas shoes..
![]() Wash your brush and blend the colours on your canvas shoes.
Wash your brush and blend the colours on your canvas shoes.
![]() Paint the trimmings and straps with pebeo gold
Paint the trimmings and straps with pebeo gold
![]() Let dry or use a hairdryer to speed up the drying process
Let dry or use a hairdryer to speed up the drying process
![]() Squeezing the nozzle, form stars of different sizes over your painted shoes.
Squeezing the nozzle, form stars of different sizes over your painted shoes.
Decoupage on canvas
What you need
![]() Mod Podge
Mod Podge ![]() Canvas
Canvas ![]() Serviettes of your choice
Serviettes of your choice

All you need is mod podge or white glue, pretty serviettes of your choice.
You can use small basket from Daiso, 8x8 inches canvases, wooden plaques, tins or even glass jars. For the floral decoupage.
Steps
![]() I painted a light sand colour as background of my serviette is that colour too. ( The trick is to keep to the same colour as the background of your serviette )
I painted a light sand colour as background of my serviette is that colour too. ( The trick is to keep to the same colour as the background of your serviette )
![]() Dry it with a hairdryer.
Dry it with a hairdryer.
![]() `Cut out the design you want from the serviette and tear of 2 plys of thin tissue from that serviette.
`Cut out the design you want from the serviette and tear of 2 plys of thin tissue from that serviette.
![]() Keep your hands dry while doing this as the tissue is very thin and delicate and might torn easily.
Keep your hands dry while doing this as the tissue is very thin and delicate and might torn easily.
![]() Apply a layer of mod podge generously on your canvas.
Apply a layer of mod podge generously on your canvas.
![]() Using both your hands to hold the cut out design, paste it on the desired position. Do not lift up again if you realise that the position is a bit off, use your sponge brush with mod podge again to brush the surface gently, starting from inside to outside.
Using both your hands to hold the cut out design, paste it on the desired position. Do not lift up again if you realise that the position is a bit off, use your sponge brush with mod podge again to brush the surface gently, starting from inside to outside.
![]() Leave it to dry or hasten it by using a hairdryer. Varnish over once, let dry and repeat that for 2-3 times.
Leave it to dry or hasten it by using a hairdryer. Varnish over once, let dry and repeat that for 2-3 times.
Most of those serviettes were collected over the years, mainly given by friends or students who bought from overseas and who remember me, I am thankful!
Marble Art
2 young siblings were at my studio yesterday having great fun with marbling art.Parents, you might want to try this out with your children too. It's easy and fun.
Steps
![]() I used enamel paints which were given to me, some scraps, coloured craft papers, plenty of toothpicks, plastic container to be filled with water.
I used enamel paints which were given to me, some scraps, coloured craft papers, plenty of toothpicks, plastic container to be filled with water.
![]() Have your gloves ready .
Have your gloves ready .
![]() Simply drop a few drops of enamel paints on the water and swirl together with the tooth pick to create designs.
Simply drop a few drops of enamel paints on the water and swirl together with the tooth pick to create designs.
![]() Lower the paper gently onto the surface of the water so that it can pick up the design you have created.
Lower the paper gently onto the surface of the water so that it can pick up the design you have created.
![]() Put on the gloves and lift up the paper carefully. Leave the paper to dry on newspaper or unwanted cardboard for a few hours.
Put on the gloves and lift up the paper carefully. Leave the paper to dry on newspaper or unwanted cardboard for a few hours.
![]() You can create your own master art pieces, trying out on small canvases or create your own gift wrap paper, book covers, etc.
You can create your own master art pieces, trying out on small canvases or create your own gift wrap paper, book covers, etc.
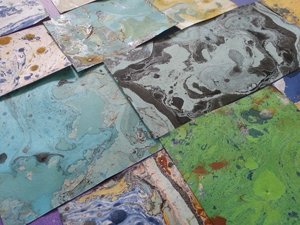
If you are using enamel paints or nail polish, open the windows and keep room ventilated with fans on. Alternatively, you can use acrylic paints which is quite odourless, I have not tried that yet though. But the young kids in my art classes are forever fascinated by the colours formation!!