

In this holiday gift ideas segment, I will include some simple ideas which made thoughtful and personal gifts for family and friends. Some of these ideas incorporate the use of altered art, decoupage,papercrafts and stencilling.
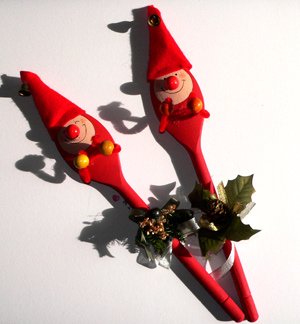
Christmas Elves
Things you need :
![]() Round wooden spoon
Round wooden spoon
![]() Red felt
Red felt
![]() Small golden bells
Small golden bells
![]() Black markers ( waterproof )
Black markers ( waterproof )
![]() Acrylic paint ( flesh tone and red )
Acrylic paint ( flesh tone and red )
![]() Red pipe cleaners
Red pipe cleaners
![]() Red wooden beads, orange wooden beads
Red wooden beads, orange wooden beads
![]() Christmas ornament
Christmas ornament
![]() Glue guns
Glue guns
![]() Silver or gold ribbons
Silver or gold ribbons
 |
Steps
![]() Paint the wooden spoon red except for the top round end.
Paint the wooden spoon red except for the top round end.
![]() On the protruded sides of both spoons, paint a 4.5 cm diameter circle with fresh tone.
On the protruded sides of both spoons, paint a 4.5 cm diameter circle with fresh tone.
![]() For better coverage, you need to paint 2 layers. ( refer to painting tips )
For better coverage, you need to paint 2 layers. ( refer to painting tips )
![]() Cut the red pipe cleaner to a length of 15cm.
Cut the red pipe cleaner to a length of 15cm.
![]() Using a black marker, draw in the eyes and smiling mouths.
Using a black marker, draw in the eyes and smiling mouths.
![]() Cut a triangle from the red felt ( approx. 13 x 13) cm.
Cut a triangle from the red felt ( approx. 13 x 13) cm.
![]() Fold felt into cone shape (making a hat for the elf )
Fold felt into cone shape (making a hat for the elf )
![]() Attach hats on the elves' head with a glue gun.
Attach hats on the elves' head with a glue gun.
![]() Chain 2 orange beads into the red pipe cleaners. (refer to picture)
Chain 2 orange beads into the red pipe cleaners. (refer to picture)
![]() Attach "nose" onto the "face"
Attach "nose" onto the "face"
![]() Attach red pipe cleaners ( with beads ) onto the spoon.
Attach red pipe cleaners ( with beads ) onto the spoon.
![]() Attach Christmas ornament on the handle of spoon.
Attach Christmas ornament on the handle of spoon.
![]() Tie the ribbon on the handle of the spoon.
Tie the ribbon on the handle of the spoon.
![]() Your friends will be pleased to have these adorable and festive elves.
Your friends will be pleased to have these adorable and festive elves.
Many exciting gift ideas awaiting you in the following pages:
Refer to Christmas stain glass ornaments, tea light glasses ideas in glass painting page
Make your own gift bags in papercraft page.
Looking for hands- on creative workshops, to learn how to make handmade gifts, go to workshops page.
Looking for gifts for all occasion, go to items for sale.
Christmas gift tags

Materials you need:
![]() 5.5" x3.5" cardstock
5.5" x3.5" cardstock ![]() ribbon
ribbon ![]() christmas rubber stamp
christmas rubber stamp ![]() StazOn-timber brown
StazOn-timber brown ![]() gold vellum 2"x 2.5"
gold vellum 2"x 2.5"![]() embossing tool
embossing tool ![]() foam mat
foam mat ![]() scissors
scissors ![]() glue tape
glue tape ![]() glittery glue
glittery glue ![]() pop dots
pop dots ![]() brown cardstock
brown cardstock
Steps
![]() Stamp on the right side of the vellum, that has a sheen.
Stamp on the right side of the vellum, that has a sheen.
![]() Place the stamped image right side down on a foam mat.
Place the stamped image right side down on a foam mat.
![]() Draw the embossing tool over the vellum, pressing down gently to a whitish mark.
Draw the embossing tool over the vellum, pressing down gently to a whitish mark.
![]() Emboss all the winter clothes,including the boots.
Emboss all the winter clothes,including the boots.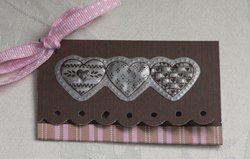
![]() Mat the vellum with cardstock, leaving about
Mat the vellum with cardstock, leaving about
2mm all round. Refer matting.
![]() Fold the cardstock into half. Refer to
Fold the cardstock into half. Refer to
card folding.
![]() Attach the cardstock with pop dots
Attach the cardstock with pop dots
![]() Apply glittery glue on the borders of cardstock.
Apply glittery glue on the borders of cardstock.
![]() Tie ribbon around the card front in a bow.
Tie ribbon around the card front in a bow.
I really love this effect and tried a few more gift tags as well. Refer to stamping.
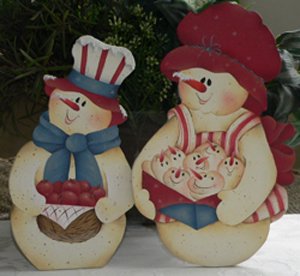
Snowman
 What you need
![]() die-cut snowman and woman
die-cut snowman and woman ![]() acrylic paints; DecoArt buttermilk, french blue, country red, burnt umber, sable brown, light buttermilk , yellow ochre, midnight blue,white; Delta Creamcoat spice tan
acrylic paints; DecoArt buttermilk, french blue, country red, burnt umber, sable brown, light buttermilk , yellow ochre, midnight blue,white; Delta Creamcoat spice tan ![]() texture paste
texture paste ![]() multi-surface sealer
multi-surface sealer ![]() Loew Cornell brushes; no.4 flat brush, 1/2" flat brush, no. 10 flat brush or no.8 filbert brush, no. 2 round brush, no.10/0 liner, 1/2" mop brush, 1/2" angular brush, bristle brush
Loew Cornell brushes; no.4 flat brush, 1/2" flat brush, no. 10 flat brush or no.8 filbert brush, no. 2 round brush, no.10/0 liner, 1/2" mop brush, 1/2" angular brush, bristle brush ![]() sandpaper
sandpaper ![]() satin varnish
satin varnish ![]() tracing
tracing
Steps for snowman
![]() Sand the wood before basecoating on both sides with buttermilk. Refer to painting on wood.
Sand the wood before basecoating on both sides with buttermilk. Refer to painting on wood.
![]() When dry, trace pattern over the surface.
When dry, trace pattern over the surface.
![]() Basecoat the hat, "nose", fruit, country red; shawl and straps on hat- french blue; basket- sable brown; Cloth and top hat - light buttermilk, using a no.8 filbert brush or no. 10 flat brush.
Basecoat the hat, "nose", fruit, country red; shawl and straps on hat- french blue; basket- sable brown; Cloth and top hat - light buttermilk, using a no.8 filbert brush or no. 10 flat brush.
![]() Use 1/2" brush , load with spice tan, shade the snowman. To shade, wet your brush,pat lightly on paper towel. Load half the brush with paint and blend it on palette paper to soften the colour.
Use 1/2" brush , load with spice tan, shade the snowman. To shade, wet your brush,pat lightly on paper towel. Load half the brush with paint and blend it on palette paper to soften the colour.
![]() Using the same technique, shade the shawl, basket, red hat, the fruit with burnt umber; highlight with light buttermilk.
Using the same technique, shade the shawl, basket, red hat, the fruit with burnt umber; highlight with light buttermilk.
![]() Use a liner to paint the lineworks.
Use a liner to paint the lineworks.
![]() Paint the eyes with burnt umber using a no. 2 round brush.
Paint the eyes with burnt umber using a no. 2 round brush.
![]() Load no.4 flat brush with country red, paint the red stripes on the hat.
Load no.4 flat brush with country red, paint the red stripes on the hat.
![]() Use a bristle brush, fly some speckles on the snowman.
Use a bristle brush, fly some speckles on the snowman.
![]() Apply texture paste on top of hat to create 3-D effects for snow. When dry, paint with white.
Apply texture paste on top of hat to create 3-D effects for snow. When dry, paint with white.
The die-cut snowman can be purchased through orders. ( only local). Each snowman cost S$15. Just email me your orders.
Tissue Paper Crafts for Halloween
Author: Jane MorrisHalloween is such a great time of year for children and many adults. What could be more fun than dressing up as your favorite character, animal, food, or even celebrity? Let us not forget the bag filled with candy or the great party! In order to prepare for Halloween you need decorations so why not save yourself a little money this year and make tissue paper crafts for Halloween.
One of the most popular Halloween/treats is the tissue paper ghost! This is a great ghost, a ghost that loves lollypops! It is also very easy to make. You will need white tissue paper, markers, yarn, and a round lollypop. You can easily make a dozen of these crafts in a few minutes time. The first thing you will need to do is cut your white tissue paper into squares (about the size of a Kleenex.) Secondly, you will hold the lollypop in one hand and with the other cover it with the tissue paper carefully so it does not rip. Then you will need to tie a small piece of yarn around the base of the covered lollypop. You can add a bow if you would like at this point or just tie the yarn off and trim the excess away.
Next, using your markers give your ghost lollypop a face and you are all done. These treats are great for trick or treaters, school party treats, or to place in a shallow vase and set on your desk at work for co-workers.
Another wonderful tissue paper craft for Halloween is a pumpkin made out of round Styrofoam ball (small, medium, large, or extra large your choice.) Just cover the Styrofoam ball with orange tissue paper and decorate it. You can purchase your decorative items at any craft store or make them with assorted colors of tissue paper. This pumpkin can also serve as a lollypop treat holder. Once you have completed the pumpkin insert lollypops of any shape into the top!
Now, Halloween would not be complete without a witch so let us take a look at a tissue paper witch! You will need black tissue paper, clear drying glue, shears, and a Barbie doll (dollar store.) You are going to make a dress for your witch out of the black tissue paper the dress does not need to be fancy you can find a Barbie doll dress pattern online just simply use the pattern to create a dress made out of black tissue paper instead of fabric. You can glue it together and slip it on the doll or you can glue it to the doll. If you have trouble finding a pattern you can always make a wrap around style dress simply by wrapping the doll in the tissue paper. Now, do not forget the hat! To make the witch's hat you will need a piece of square paper about two inches by two inches fold the paper sideways so you have a half a triangle shape then place it on the witch's head and glue or tape the ends closed! If you want, a real authentic witch be sure to give her a mole with a brown magic marker, pick up a small black cat at any craft store, and glue it to the witch's leg or in her arms!
Tissue paper crafts for Halloween are so much fun to make and really put you in the Halloween spirit. You can make spiders, zombies (use a Barbie doll just like the witch), or anything you can think of.
Article Source: http://www.articlesbase.com/crafts-articles/tissue-paper-crafts-for-halloween-5291720.html
About the AuthorNext do you need crepe paper or tissue paper to make your paper flowers or other decorating ideas. If this is the case we have just the right crepe paper to do this it is bleed resistant, fade resistant, and fire resistant and we also have tissue paper. So check out our website at: http://www.crepepaperstore.com