

Decoupage is the craft of decorating the surfaces of objects with cut-outs of printed images. The piece is then given numerous layers of varnish to protect and to conceal the edges of the paper, giving the impression that the design has been handpainted or printed.
For those of us who are not good in painting and would like to do projects fast, decoupage will be a good alternative. It does not cost much to get started. Some of the materials needed are in fact what most crafters would already have at home. I listed some materials that are needed and good to invest at home. ---- see material list
Decoupage on Paper/Wood
Coaster
Supplies
Chipboard (9 x 10.5 cm) ![]() Decoupage paper (available at Spotlight)
Decoupage paper (available at Spotlight) ![]() Mod podge (mat)
Mod podge (mat) ![]() Brush
Brush ![]() Arcylic Paint (folkart ice green light)
Arcylic Paint (folkart ice green light) ![]() Scissors
Scissors
Steps
![]() Cut coaster from chipboard, and round the corners
Cut coaster from chipboard, and round the corners
![]() Basecoat 2-3 layers of ice green light paint evenly on both sides of the coaster, drying between coats
Basecoat 2-3 layers of ice green light paint evenly on both sides of the coaster, drying between coats
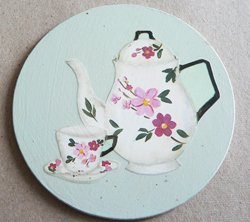
![]() Cut out big and small teacups from decoupage paper
Cut out big and small teacups from decoupage paper
![]() Arrange teacups and paste with light coat of mod podge
Arrange teacups and paste with light coat of mod podge
![]() Seal by applying thin coats of mod poge over entire coaster
Seal by applying thin coats of mod poge over entire coaster
![]() When dry (you can use a hairdryer to speed up the process), apply second layer. Varnish at least 5 to 6 layers for a smooth finish.
When dry (you can use a hairdryer to speed up the process), apply second layer. Varnish at least 5 to 6 layers for a smooth finish.

Steps
![]() Cut another coaster from chipboard
Cut another coaster from chipboard
![]() Paste scallop pattern paper on top of coaster
Paste scallop pattern paper on top of coaster
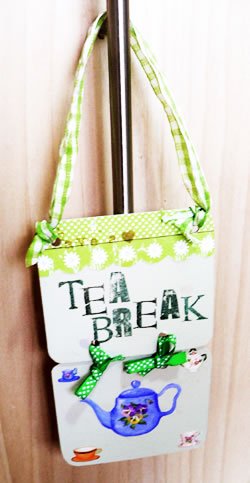
![]() Stamp 'Tea Break' on coaster, stamp 'have a' on pattern paper
Stamp 'Tea Break' on coaster, stamp 'have a' on pattern paper
![]() Punch 2 holes on top and bottom of coaster
Punch 2 holes on top and bottom of coaster
![]() Punch 2 holes on the top of the 1st coaster (the one with teacups)
Punch 2 holes on the top of the 1st coaster (the one with teacups)
![]() Refer to finishing as above
Refer to finishing as above
![]() Chain them with ribbons
Chain them with ribbons
You can hang this pretty sign in your kitchen or office to remind yourself to take that long deserved tea break! Or give it to a friend!
Decoupage on Metal
The Fairy Jug
Supplies
Refer to Tips page for materials
Steps
![]() Wash the tin jug thoroughly in detergent and warm water to remove any dirt and grease and leave it to drain dry.
Wash the tin jug thoroughly in detergent and warm water to remove any dirt and grease and leave it to drain dry.
![]() Prime the outside of the jug with light primer (if you are using light colour for base and vice versa)
Prime the outside of the jug with light primer (if you are using light colour for base and vice versa)
![]() Paint the outside of the jug with 2 coats of arcylic Buttermilk paint.
Paint the outside of the jug with 2 coats of arcylic Buttermilk paint.
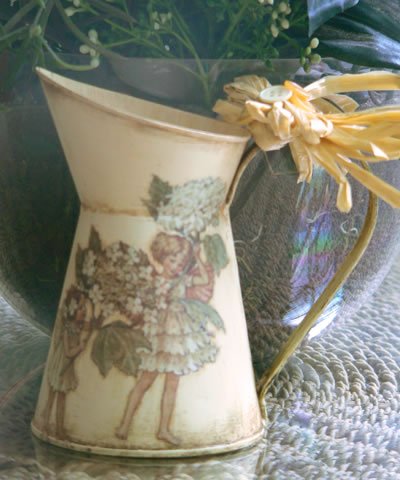
Leave to dry. ![]() Cut out flower fairy motif.
Cut out flower fairy motif.
![]() Apply the mod podge to the object (and not on the motif).
Apply the mod podge to the object (and not on the motif).
![]() Paste flower fairy motif onto the can.
Paste flower fairy motif onto the can.
![]() Apply between 10 to 12 coats of varnish to all the decorated outside surfaces, leaving between 2 hours between coats, and sand lightly for a smooth finish.
Apply between 10 to 12 coats of varnish to all the decorated outside surfaces, leaving between 2 hours between coats, and sand lightly for a smooth finish.
![]() Refer to antiquing varnish for finish.
Refer to antiquing varnish for finish.
Decoupage on Glass
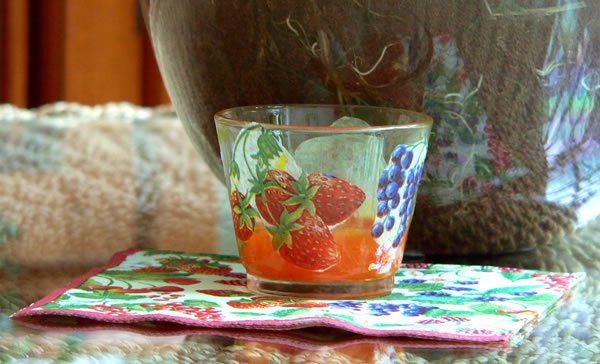
Supplies
Simple glass/bottle or even a simple bottle of essence of chicken ![]() Serviette with small motifs
Serviette with small motifs ![]() Multi-surface sealer
Multi-surface sealer ![]() A pair of sharp scissors
A pair of sharp scissors ![]() Small brush for pasting on
Small brush for pasting on
Steps
 Peel off 2 plys of tissue from the bottom leaving only top layer. Cut out the small motifs of your choice.
With a small flat brush, ( not your painting brush ) apply a little layer of sealer on the position where you want your motifs to be.
Using a soft cloth, wipe off the extra liquid and at the same time , flatten the motifs onto the glass.
Protect the finished project with a thin coat of sealer over the motifs.