Adding wordings, verses or phrases to a finished project give it an added value and a personal touch. Besides, it is also different from what you get off the rack, making it an unique and treasured piece. Most of my customers choose to customise mainly to add phrases or verses that mean a lot to them or their receivers. I will be including some inspiring projects that enable you to practise calligraphy while creating a beautiful keepsake or gift. Let me share with you some forms of letterings which I have learnt over the years.
Calligraphy
Calligraphy means the art of producing decorative handwritting or lettering with a pen or brush. Like all craft, calligraphy requires a certain amount of time for practising. There are many different sizes, shapes and types of calligraphy pens.
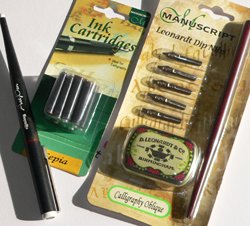
Dip pens
Many calligraphers prefer a metal dip pen because it can be used with all kinds of paints and inks mixed to different colours and consistency. Though the name implies that it is dipped in ink, this is not always the case. For a better control of paint flow and consistency of colour density, we feed it with a paintbrush of gouache paint. A dip pen is made up of a handle and a range of different sized nibs. Some nibs have an integral reservoir, others heve a slip-on version.
Felt-tipped pen
You can also use a zig pen that is waterproof; non - bleeding. It is useful for quick work, and will travel well in a pocket. The nips come in 2 different sizes; a wide end, 5.0 mm and a finer end 2.0 mm. Zig pens are available in bright colours and provide instant results with non-clogging 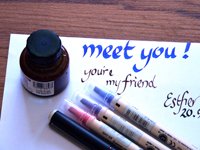 inks. As these are dye-based inks, they may fade over time . Do make sure that your projects will not be exposed to light for too long. Felt tips will also soften and lose their sharpness overtime.
Hold your pen perpendicular to the paper, keeping the nip at a 45 degree
.Practise writing.
Other markers that you can use for projects are Sakura pigment micron pen or micronoi pen.
Flat brush
One of my favourite forms of calligraphy, I used flat brush to write very often. You may need a size 2, 4, 6 or 8 flat brush depending on the size of your projects. Always make sure that your brush is in good condition (a sharp chisel edge).
![]() Hold the brush perpendicular to the layout paper .
Hold the brush perpendicular to the layout paper .
![]() Mark four nip widths on your paper.
Mark four nip widths on your paper.
![]() Load your brush with paint, making sure that you have a sharp writing edge , not having too much paints.
Load your brush with paint, making sure that you have a sharp writing edge , not having too much paints.
![]() Practice the words you plan to use on the paper.
Practice the words you plan to use on the paper.
Round brush
 The Chinese use round brush or "mao bi" for therir calligraphy. In this case, I am not referring to that form of art but our round paint brush; comes in different sizes, no. 1, 2, 3 ,4 ,5, 6, depending on your requirements.
Usually, I use a no. 3 round brush for my project.
![]() Load brush with acrylic paints, mix a bit of water for consistency flow of paints.
Load brush with acrylic paints, mix a bit of water for consistency flow of paints.
![]() Add pressure when you want to create width for the lettering.
Add pressure when you want to create width for the lettering.
![]() Pull gently when you want to create a thinner line.
Pull gently when you want to create a thinner line.
![]() For each alphabet, dip into the paint again
For each alphabet, dip into the paint again
for consistency.
Just remember that practice makes prefect.

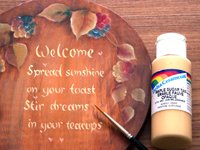
Liner brush
![]() Dip brush into freshly squeezed acrylic paint (preferably
Dip brush into freshly squeezed acrylic paint (preferably
a thicker kind like Jo Sonja )
![]() Write as your own handwriting.
Write as your own handwriting.
![]() Load paint for each alphabet to form consistency in your work.
Load paint for each alphabet to form consistency in your work.
![]() At each end of wordings, use a stylus or tip brush with paint to form dots.
At each end of wordings, use a stylus or tip brush with paint to form dots.
Tracing prints
![]() Print your lettering, verses ( short preferably ) and phrases on paper.
Print your lettering, verses ( short preferably ) and phrases on paper.
![]() Transfer the outlines to your project.
Transfer the outlines to your project.
![]() Carefully but confidently, fill in
the gaps with definite strokes.
Carefully but confidently, fill in
the gaps with definite strokes.
![]() Pay attention to the serifs; these must be rendered as fine lines and need a steady hand.
Pay attention to the serifs; these must be rendered as fine lines and need a steady hand.
![]() After you have finished, check for uneven areas and touch up.
After you have finished, check for uneven areas and touch up.
Rubs-on and Letterset
With the popularity of scrapbooking, rub-ons and letterset are coming back to life in the art circle. In the 80s, graphic artists use a lot of letterset and rub-ons for their mock- up to pitch for clients.