
I chanced upon a very interesting book last year; was very inspired by the beautiful projects but simply found no time to lay hands to do them. This year, when I decided to launch this website, I found it in the library again! I would like to share this idea with everyone.
Ribbon switch plate covers
Supplies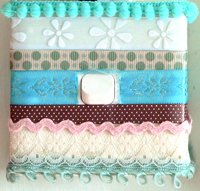
![]() Assortment of ribbons (coordinated colours)
Assortment of ribbons (coordinated colours)
![]() Craft scissors
Craft scissors
![]() Plastic switch plate
Plastic switch plate
![]() Craft knife
Craft knife
![]() Doubled - sided tape
Doubled - sided tape
Steps
![]() Lay your ribbons out before you adhere them to your switch plate.
Lay your ribbons out before you adhere them to your switch plate.
![]() Make sure that the colours and patterns work well together and that you have enough trim to cover the entire plate.
Make sure that the colours and patterns work well together and that you have enough trim to cover the entire plate.
The picture on the top right is self explanary.
Embellished card
Materials you need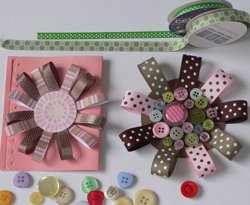
![]() Paper trimmer
Paper trimmer
![]() Cutting mat
Cutting mat
![]() Metal rule
Metal rule
![]() A pair of sharp scissors
A pair of sharp scissors
![]() Craft knife
Craft knife
![]() Pencil (2B)
Pencil (2B)
![]() Ribbons and pattern paper
Ribbons and pattern paper
![]() Border punch
Border punch
![]() Glue tape
Glue tape
![]() Assortment of buttons
Assortment of buttons
![]() Small piece of chipboard
Small piece of chipboard
Steps
![]() Measure a card 7" x 4.5" and cut. Refer to " how to fold a card "
Measure a card 7" x 4.5" and cut. Refer to " how to fold a card "
![]() On the bottom side of the card, use a border punch, punched out a pretty edge. (optional) Alternatively, you can use a craft scissors to create a patterned edge.
On the bottom side of the card, use a border punch, punched out a pretty edge. (optional) Alternatively, you can use a craft scissors to create a patterned edge.
![]() Cut out seven 4.5" ribbon and 4.5 paper trimmings about 0.5" width
Cut out seven 4.5" ribbon and 4.5 paper trimmings about 0.5" width
![]() Fold and tape each of these into half with a glue tape.
Fold and tape each of these into half with a glue tape.
![]() Cut out a chipboard circle, diameter 1.5".
Cut out a chipboard circle, diameter 1.5".
![]() Run glue tape over one side of chipboard and stick folded ribbons and trimmings on, spacing them equally.
Run glue tape over one side of chipboard and stick folded ribbons and trimmings on, spacing them equally.
![]() Cut a patterned 1.5" circle and paste over them.
Cut a patterned 1.5" circle and paste over them.
![]() Paste handmade flower over the folded card.
Paste handmade flower over the folded card.
![]() Voila! A pretty card for all occasion.
Voila! A pretty card for all occasion.
You can also decorate the top circle with an assortment of buttons. Besides, you can also use this embellished flower for scrapbooking pages.
Dual-usage curtain
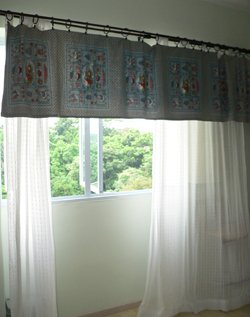 I changed my studio room curtain for washing last week. One of my students commented that it is a new curtain and I told her that it is actually a table cloth. She was amazed and think that it is a brilliant idea.
So, I decided to share in this segment. I sewed this country style tablecloth some years ago and had put this aside for some time because the colour does not go with my present sitting room scheme.
As my studio requires plenty of light and yet cannot be too glaring, I folded the cloth into half and hang it. Then I added in my day curtain to shield the morning sun.
Now, I can enjoy the beautiful greenery when I do my art and craft!
Come back for more ideas as this site is changing
all the time!
Making a shaker box
Many people spent a lot on scrapbooking embellishments and miss out the fun and creativity of doing them. I learnt to make these shaker boxes from a magazine and recreated the designs and I like them all.
To make the shaker box on the left,
You need:
![]() Pink felt sticker
Pink felt sticker ![]() white lace
white lace ![]() stringed pearls
stringed pearls![]() cardstock
cardstock ![]() beads
beads ![]() glue gun
glue gun![]() scissors
scissors ![]() transparency
transparency
Steps
![]() Cut out a flower shape from the felt and the cardstock.
Cut out a flower shape from the felt and the cardstock.
![]() Cut the transparency, about 3mm larger than the die cut circle of the flower.
Cut the transparency, about 3mm larger than the die cut circle of the flower.
![]() Remove the sticker from felt and adhere transparency over the circle.
Remove the sticker from felt and adhere transparency over the circle.
![]() Place the beads on the cardstock, try to gather them to the center.
Place the beads on the cardstock, try to gather them to the center.
![]() Place the felt flower with transparency over the cardstock.
Place the felt flower with transparency over the cardstock.
![]() I add in some lace and stringed pearls to give it a "sweet" look.
I add in some lace and stringed pearls to give it a "sweet" look.
I have no idea when I will use this shaker but I am glad to share with you and please share this technique with your friends too.
Embellished your shoes

I painted this pair of shoes using Jo Sonja's acrylic paint . I base it with Decoart limeade mixed with Jo Sonja's fabric medium. This is to give it a good coverage. Using my old round and liner brush, I painted some flowers, leaves and swirls all over the shoes.Go to my gallery to see more views.
When dry, I varnished it with one layer of satin varnish for protection.
I found some cute mini buttons from my collection, and added on some appropriate place using my glue gun. I am happy with the result.