

Scapbooking does not cost a lot if you know the basic materials you need. The first time I stepped into a scrapbooking craft store, I was overwhelmed by the many beautiful works I saw. The pattern papers and embellishments were so captivating. I end up buying many items I did not planned; having no clue when I will use them, some were not even used till today. I will share with you what you really need.
Why do we scrapbook
For many of us, it could be the creativity that capitivated us. Others find it a beautiful way to showcase photos of their loved ones, recording their present feelings; making a chronicle of their home life and history. Whatever it is , we all enjoy the process of scapbooking as it brings hours of joy and is very theraputic.
What should we scrap about
There are so many topics we could scrap on:
 10 Things about Me
Special Events eg. Weddings, Birthdays, Anniversary
School Days
Best friends
Family Tree
Life Milestones
Favourite
Food
Baby's First year
Find out more from the following articles:
What we need
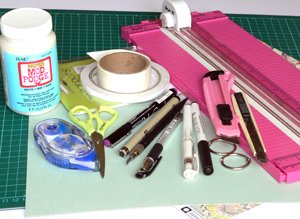
Paper trimmer
Glue tape
Precision-tip scissors
An acid-free,
black, medium tip pen (for journalling)
Card stock (acid-free because acid will damage photos over time)
Pattern paper
Glue dots
Mod Podge (for pasting bigger surfaces)
Glue stick
Craft knife
Cutting Mat
Metal Ruler
As time goes by, you may want to invest on more tools. But meanwhile, all those listed should be sufficient, and some of these, you may already own them.
How to get started
For beginner, I would suggest that you start from the basic.
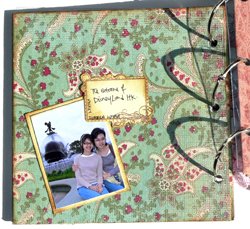
A basic scrapbook page will consists of 2-3 photos (matted), a headline, a few embellishments, and probably some journalling.
Choose 3 to 4 photos pertaining to the same theme.
Choose a pattern paper.
Choose a cardstock that contrasts but does not clash with your pattern paper.
Steps to mat
Measure each photograph that you have choosen.
Cut your mat (cardstock) 1/4 inch wider and longer than your photos for a 1/8 inch border, vary the size according to your choice.
With a paper trimmer, Trim the cardstock.
Apply glue tape to the back of the photos and adhere.

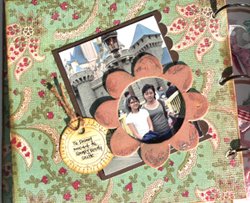
Samples of matting. On the right picture, I used matting with scallops and add on a chipboard scallop frame on top to focus on the main picture - my girls.You can also call this cropping.
How to crop a photo
Cropping a photo is an essential skill that every scrapper should have. Basically, it means elimiminating the unwanted parts of the photo so as not to distract from the mean story. A good cropping can enhance your photo and even the whole page.
What You Need: paper trimmer, cardstock scraps, photo, acid free pen or pencil.
Steps to crop: Cut 2 L-shaped pieces of cardstock and lay them opposite each other on your photo. You can move them up and down till you are satsified with the sizing. Mark it with your pen With this mark, you can trim your photo with a paper trimmer.
With some practice, you will be able to crop smart photos, and very soon, you do not have to depend on the "rulers".
For more ideas, check out our gallery page.