

Stamping or rubber stamping is such a versatile craft. You can learn the techniques of stamping on different surfaces such as tin foil, shrink plastic, acetate, acrylic, wood, fabric and glass. I will be sharing as many refreshing ideas as I can so that you can create many more memorable craft and gift.
Basic stamping knowledge
In stamping, there are two possible mistakes that you can avoid.
 Do not stamp with insufficient pressure or uneven pressure. This will cause uneven and patchy image.
Do not use too much pressure and rock stamp as this will cause over-heavy and blurred image.
Steps to take note
Check that the stamp is clean, free from dirt or hairs.
If you are inking small stamps, tap the stamp directly on the surface of the pad. Remember not to press too hard.
If your stamp is larger than the ink pad, tap the inkpad on the stamp instead.
Always check (very quickly) if ink is even or not by holding against the light.
Clean away any built-up ink (usually around the corners) with a cotton bud.
Hold the large mount stamps with both hands.
Press rubber stamp side down on your project, making sure that your pressure is right.
Lift the stamp away and leave the print to dry before handling.
To ensure that the print is totally dry, just use a hair dryer or heat gun before working on it.
Surfaces you can stamp on
Besides paper and card, there are so many other mediums you can experiment :
Wood
You should use fast drying ink like StazOn . Refer to tips on painting on wood.
Acetate, Acrylic and glass
Use fast drying ink like StazOn on these smooth surfaces. Acetate is a thin plastic that comes in ready - to - use sheet . You can layer stamped images over textured cards or other interesting backgrounds. Acrylic is a thicker plastic which scrapbookers use often for clear albums. As the surface of glass is very smooth, I suggest that beginner should keep to flat surface if you wish to experiment.
Fabric
Use fabric ink like VersaCraft. Smooth fabrics such as silk and cotton give best result. Always make sure that your fabric has been washed to avoid shrinking of the design. Heat set the stamping on an iron so that the ink does not bleed. Fabric accessories such as canvas shoes and bags can also be stamped!
Fun foam
Use fast drying ink like Brillance. It is compact, comes in thin sheet and can be cut out easily. It also comes in a variety of bright colours. You can heat the surface carefully with a heat gun and stamp into the foam to create a relief print. This relief print can also be used as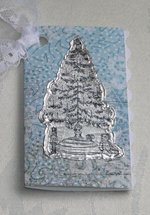 a stamp.
Tin / Metal
Use fast drying ink like StazOn. You can even stamp on metal or
aluminium Foil. The foil is thin and can be drawn on easily with an
embossing tool (stylus or sharp object).
Shrink Plastic
Use fast drying ink like Brillance. This is available in translucent, opaque white, clear and black. It can be stamped, coloured, and cut out and then heated with a heated gun or baked to make badges, buttons, jewelleries and miniatures. Use larger stamps as the images will be greatly reduced. It is so interesting and I am sure to try on as soon as I get my shrink plastic! Do come back often for updates.
Below are some craft ideas :
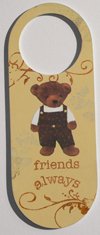
Stamping on Wood
Door hanger
Materials you need
![]() Wooden door hanger
Wooden door hanger ![]() acrylic paints - buttermilk
acrylic paints - buttermilk ![]() sandpaper
sandpaper ![]() satin varnish
satin varnish ![]()
 butterfly rubber stamp
 ![]() decoupage paper - bear
decoupage paper - bear ![]() scissors
scissors ![]() mod podge
mod podge ![]() swirling design clear stamp
swirling design clear stamp ![]() friends, always clear stamp ( same pack as swirling design )
friends, always clear stamp ( same pack as swirling design )
Steps
![]() Prepare wood surface. (refer to tips on painting on wood)
Prepare wood surface. (refer to tips on painting on wood)
![]() Paint door hanger with acrylic paint - buttermilk.
Paint door hanger with acrylic paint - buttermilk.
![]() When dry, stamp "butterfly" rubber stamp on desired areas or refer picture for ideas.
When dry, stamp "butterfly" rubber stamp on desired areas or refer picture for ideas.
![]() Stamp " friends", " always" and swirling design with darker ink.
Stamp " friends", " always" and swirling design with darker ink.
![]() Using mod podge, glue decoupage on the door hanger( refer to picture on placement.
Using mod podge, glue decoupage on the door hanger( refer to picture on placement.
![]() Flatten the surface with your hand.
Flatten the surface with your hand.
![]() Clean off the extra liquid.
Clean off the extra liquid.
![]() Make sure that everything is dry, apply 2 coats of varnish
Make sure that everything is dry, apply 2 coats of varnish
Find out more from the following articles about stamping:
Gift tag
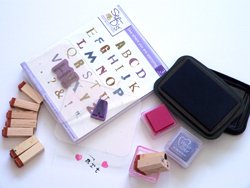
I found these little cards that Charlotte had been keeping for the past 11 years. They were given by a young girl who was demonstrating stamping and 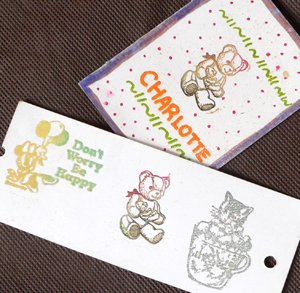 embossing.
What you need
![]() stamp
stamp ![]() coloured markers
coloured markers
![]() embossing powder
embossing powder ![]() heat gun
heat gun
![]() white folded card
white folded card ![]() VersaColour multicolour inkpad
VersaColour multicolour inkpad
Steps
To emboss, you need 3 easy steps.
![]() Stamp the bear image
Stamp the bear image
![]() Cover it with the embossing power. Tip the excess powder onto a clean piece of paper ( you may keep it back)
Cover it with the embossing power. Tip the excess powder onto a clean piece of paper ( you may keep it back)
![]() Use the heat gun to melt the power. Do not overheat by placing too near to the card. Keep at least 1" away.
Use the heat gun to melt the power. Do not overheat by placing too near to the card. Keep at least 1" away.
![]() Use a marker, decorate as desire.
Use a marker, decorate as desire.
Creating different designs with one single stamp
Rubber stamp are very pricy and we may not be willing to invest in them not if you know that one stamp can give various looks if you change the presentations by stamping the images on different surfaces. (as mentioned earlier)
Fabric stamping

Materials you need:
![]() White cotton fabric "4"x3"
White cotton fabric "4"x3" ![]() hedgehog rubber stamp
hedgehog rubber stamp ![]() fabric paint
fabric paint ![]() " love " rubber stamp
" love " rubber stamp ![]() canvas " 8"x6"
canvas " 8"x6" ![]() acrylic paint- buttermilk
acrylic paint- buttermilk ![]() thin rope
thin rope ![]() StazOn-timber brown
StazOn-timber brown![]() fabric craft glue
fabric craft glue ![]() brush
brush
Steps
![]() Paint the canvas with buttermilk and fold into half.
Paint the canvas with buttermilk and fold into half.
![]() Stamp hedgehog on the centre of fabric.
Stamp hedgehog on the centre of fabric.
![]() Paint hedgehog with fabric paint.
Paint hedgehog with fabric paint.
![]() Fold about 1/8" of fabric all round and iron to heatset and press when painting is dry.
Fold about 1/8" of fabric all round and iron to heatset and press when painting is dry.
![]() Paste fabric on canvas and coil thin rope round to create border.
Paste fabric on canvas and coil thin rope round to create border. ![]() stamp "love" on the bottom of canvas.
stamp "love" on the bottom of canvas.
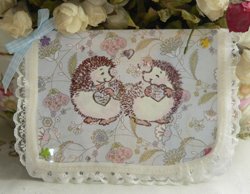
Stamping on acetate
Materials you need:
![]() "8 x 5" pattern paper
"8 x 5" pattern paper ![]() lacy ribbon
lacy ribbon ![]() hedgehog rubber stamp
hedgehog rubber stamp ![]() StazOn-timber brown
StazOn-timber brown ![]() mini coloured brads
mini coloured brads ![]() glass paint s- white , pink
glass paint s- white , pink ![]() baby blue ribbon
baby blue ribbon ![]() double-sided tape
double-sided tape
![]() "8 x 2.5" acetate
"8 x 2.5" acetate
Steps
![]() Stamp hedgehog on the centre of acetate.
Stamp hedgehog on the centre of acetate.
![]() Paint the bodies of the hedgehogs.
Paint the bodies of the hedgehogs.
![]() Attach acetate onto folded card with pastel coloured brads.
Attach acetate onto folded card with pastel coloured brads.
![]() Attach lacy ribbons round the card and a small ribbon to top off.
Attach lacy ribbons round the card and a small ribbon to top off.
This card looks sweet, givng another different look.
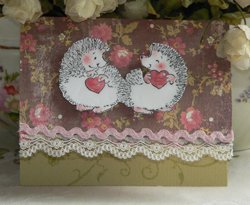
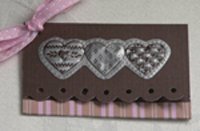
Raised-up image
 Materials you need:
![]() 8" x 5" doubled-sided pattern paper
8" x 5" doubled-sided pattern paper ![]() lacy ribbon
lacy ribbon ![]() hedgehog rubber stamp
hedgehog rubber stamp ![]() StazOn-timber brown
StazOn-timber brown ![]() white card
white card ![]() paint
paint ![]() glossy accents (optional)
glossy accents (optional) ![]() pop dots
pop dots
Steps
![]() Stamp hedgehog on the centre .
Stamp hedgehog on the centre .
![]() Paint the cheeks of the hedgehogs, and the hearts red.
Paint the cheeks of the hedgehogs, and the hearts red.
![]() Fold card to show inside colour.
Fold card to show inside colour.
![]() Attach hedgehog on the centre of front card with pop dots.
Attach hedgehog on the centre of front card with pop dots.
![]() Attach decorative ribbons of your choice.
Attach decorative ribbons of your choice.
![]() Apply glossy accents to protect and dimensionalise the stamped image.
Apply glossy accents to protect and dimensionalise the stamped image.
This card gives yet another look. I love them all. I just did them last night after I bought the rubber stamp in the afternoon.I will be sharing more as soon as I have time. Do come back soon!
There are lots more to share:
More ideas on stamping in decoupage page
Looking for hands- on creative workshops, to learn how to make handmade gifts, go to workshops page.
Looking for gifts for all occasion, go to items for sale.
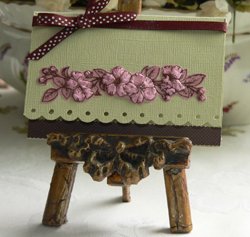
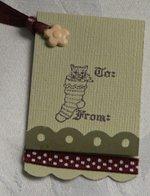
Stamping on vellum
 Materials you need:
![]() 6" x 4.5" cardstock
6" x 4.5" cardstock ![]() ribbon
ribbon ![]() flower rubber stamp
flower rubber stamp ![]() StazOn-timber brown
StazOn-timber brown ![]() pink vellum
pink vellum ![]() border cutter
border cutter ![]() embossing tool
embossing tool ![]() brown scrap
brown scrap ![]() foam mat
foam mat ![]() scissors
scissors ![]() glue tape
glue tape
Steps
![]() Stamp on the right side of the vellum, that has a sheen.
Stamp on the right side of the vellum, that has a sheen.
![]() Place the stamped image right side down on a foam mat.
Place the stamped image right side down on a foam mat.
![]() Draw the embossing tool over the vellum, pressing down gently to a pink whitish mark.
Draw the embossing tool over the vellum, pressing down gently to a pink whitish mark.
![]() Emboss all the flowers, including the buds.
Emboss all the flowers, including the buds.
![]() Trim the finished image , leaving about 2mm all around.
Trim the finished image , leaving about 2mm all around.
![]() Fold the cardstock into half. Refer to card folding.
Fold the cardstock into half. Refer to card folding.
![]() Cut the bottom end of card with border cutter.
Cut the bottom end of card with border cutter.
![]() Attach the wrong side of vellum onto card with glue tape, applying tape on the parts not embossed.
Attach the wrong side of vellum onto card with glue tape, applying tape on the parts not embossed.
![]() Attach brown strips of scraps on the inside bottom of card.
Attach brown strips of scraps on the inside bottom of card.
![]() Tie ribbon around the card front in a bow.
Tie ribbon around the card front in a bow.
I really love this effect and tried a few more gift tags as well.
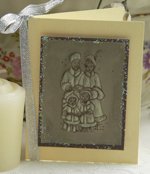
Perfect Pearls
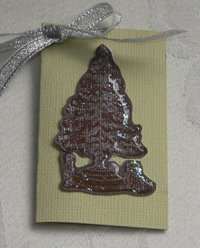 I was trying to experiment a few more of these special techniques, using Perfect Medium, Perfect Pearls and glossy accents.
Steps
![]() Using Perfect Medium, I stamped Christmas tree image on a dark brown cardstock.
Using Perfect Medium, I stamped Christmas tree image on a dark brown cardstock.
![]() Dip lightly into Perfect Pearls (silver) and " dust" the stamped image witha soft dry brush.
Dip lightly into Perfect Pearls (silver) and " dust" the stamped image witha soft dry brush.
![]() Use a hairdryer to blow out all the excess powder.
Use a hairdryer to blow out all the excess powder.
![]() Apply glossy accents on the image and let dry.
Apply glossy accents on the image and let dry.
![]() Cut out the image leaving about 1-2mm round it.
Cut out the image leaving about 1-2mm round it.
![]() I glue taped it over my leftover cardstock.
I glue taped it over my leftover cardstock.
![]() To add some colours to it, I also dab some glitter glue over to give the shimmering look.
To add some colours to it, I also dab some glitter glue over to give the shimmering look.
Try this out. It can also add dimensions to your stamped image, an alternative to embossing.